Saturday, September 29, 2012

Jingle bell rockin'morning!

This morning I held my Christmas Card stamp class. Those dedicated crafty gals made 15 cards each! And even though it took longer than we originally thunked, they turned out beeyouteeful!
There was a moose sighting, Pumpkin Spice Lattes and Christmas carols from all voices ranging from Bing Crosby to Annie Lennox to Diana Krall to Twisted Sister and everything in between!!!
Sorry, I'm not showing you the whole cards, you should have been here. Or, get yourself on the Christmas card mailing list of one of these lovely ladies pronto! I'll show you some teasers though!


-We used scented embossing powder (sugar and spice), glitter, ribbons, buttons and all kinds of goodness. And we had these...


Pumpkin Spice Lattes
-8 T of pumpkin puree
-8 T of vanilla
-2 t of cinnamon
-8 cinnamon sticks
-4 cups of strongly brewed coffee
-6 cups of milk
-8 T of sugar
-whipping cream
Mix together the coffee and milk. Whisk together the pumpkin, vanilla (yes, that's 8 tablespoons), sugar, cinnamon then whisk into coffee mixture. The directions say to heat it for 3 hours in your crockpot but I didn't get up that early, so I heated it on the stovetop. Garnish with whipped cream and a cinnamon stick if so desired. Then stamp some shit lovely creative thoughtful creations.


Posted using BlogPress from my iPad

Thursday, September 20, 2012

I really love you, Stampin' Up!


Have you ever crafted something that just made you smile? It can be the simplest project that gives you the most satisfaction sometimes.

The other day I was getting projects ready for a Stampers Club night. As per normal, I was feeling a lot of stress; finding time to make the projects and prepare for the class, the usual family drama and stress, some workplace issues, housework-laundry-chores stress...and financial stress due to the horror that is September.

I started with this


Plain old Basic Black and Very Vanilla card stock. I pulled out an old favorite wheel, which lets face it, most of us aren't using much these days. Sit back for a moment and try to remember when the last time you used one of your Stampin' Around wheels was. Not one of mine, or one of a different demonstrators wheels...your own. Here's a challenge: tell me when the last time was in the comment section and I will brighten your mailbox with a beautiful wheeled creation.

I used Music Notes (120327). It's so pretty, and instantly gave me the look of beautiful patterned paper.


I also used some tags printed with MDS and the Lots of Tags Sizzlets (114508), some Very Vanilla taffeta ribbon (119960) some Soft Suede ink and a stampin' sponge and Kablamo (I really dislike the disgusting over use of 'voila' or even worse 'walla' so today I am trying out 'Kablamo' :-) now I've got a totally beeeyuuuuteeful card!


It made me smile, sigh a happy little sigh and remember why I love stamping so much.

Alas, the happiness was short lived. This morning I dropped my iPad and smashed the screen. I just went and wheeled a piece of card stock, but it turns out even a pretty wheel isn't going to put me in a better mood today. Next I'm going to try folding laundry.

If for some reason that doesn't work I will try wine.

Or go straight to the wine.

Bye.


Friday, September 14, 2012

A break from Christmas stuff...


Thank You card, but how easy would be to turn this into a 'for Baby' card? Pretty easy, that's how easy.

Do you need a variety of cards for different occasions? Thats what Stampers Club, or my hands on classes are great for!

Embossing gives your papercrafting projects a sophisticated look and feel -- yet it is so easy to do! We used the Big Shot, the Adorning Accents Edgelits Dies, and the Adorning Accents Textured Impressions Embossing Folders to create the fabulous borders you see here.

Supplies:

Baby Bundle - Clear-Mount Stamp
Pool Party 8-1/2 X 11 Card Stock
So Saffron 8-1/2X11 Card Stock
Whisper White 8-1/2X11 Card Stock
Basic Gray Classic Stampin' Pad
Pool Party Classic Stampin' Pad
So Saffron Classic Stampin' Pad
Jet Black StāzOn Pad
So Saffron 3/8 Inch Taffeta Ribbon
White Baker's Twine
Designer Buttons - Subtles Collection
Stampin' Dimensionals
Aqua Painter
3/16 Inch Corner Punch
Big Shot Die-Cut Machine
Adorning Accents Edgelits Die
Adorning Accents Textured Impressions Embossing Folders


- Posted using BlogPress from my iPad

Tuesday, September 11, 2012

104 days til Christmas

That sounds like a lot right?

How many of those days will you be at work? About 65? Give or take a couple? So now we are down to 39 days til Christmas.

How many prior commitments do you have before then, like meetings, weddings, family gatherings, doctor appointments, classes. Add it together, maybe 5 total days worth? Now we are at 34 days til Christmas.

The average person will spend 12 hours grocery shopping over the next few weeks, and about 95 hours preparing and cleaning up from meals. That's (hmmmm) 4.5 days, but I will give you the half day to allow for dining out. Now we are at 30 days til Christmas.

How much time between now and Christmas will you spend shuttling kids around to various activities. 12 hours per week? Some of you might be more, some might be less, let's say 120 hours which is 5 days. For those of you who don't have to shuffle kids around, you and I both know you are just as busy doing other things, so you lose these days too...sorry! 25 days and counting...

Holiday parties and gatherings? For work, neighbors, committees, friends etc. maybe four or five? That's about 25 hours, and at least a day for each of them to recover the next day :-) you've just lost 6 days.

Housework, laundry, bill paying? One full day per week-12 more days. Entertainment (movies, restaurant, hikes in the beautiful fall weather, concerts, socials, poetry readings), lets say you have a below average social life, one day per week-another 12 days. Good grief, I'm just getting started and

You have already missed Christmas!!!

Forget about Christmas shopping, baking, traveling, being sick, last minute coffee dates, poor weather.....Sleeping!!!

My point is, come to my 'get a head start on Christmas before it gets away from you' Christmas card class on Sept 29th. Register today, you don't want to miss out and be even more behind!

In the meantime, here is a fun little number. That simply scored tool makes things like this so easy! Looks like I slaved away for hours!


Jolly Christmas card
Design your own 3D Christmas tree using our Simply Scored tool. It looks intricate but takes just minutes to make!


Supplies:

No Peeking Clear-Mount Stamp Set
Always Artichoke 8-1/2X11 Card Stock
Baja Breeze 8-1/2X11 Card Stock
Soft Suede 8-1/2" X 11" Card Stock
Summer Starfruit 8-1/2" X 11" Card Stock
Whisper White 8-1/2X11 Card Stock
Basic Black Classic Stampin' Pad
Summer Starfruit Classic Stampin' Pad
Tangerine Tango Classic Stampin' Pad
Stampin Write Markers - Regals Collection
Stampin Write Markers - Brights Collection
Boho Blossoms Punch
Simply Scored scoring tool

And I guess I should say Merry Christmas, since it looks like we are both going to miss it!


Posted using BlogPress from my iPad

Thursday, September 6, 2012

Oops they did it again...

But it is so totally NOT an OOPS.

Stampin' Up! made me very happy this morning when I saw their new offer on the demonstrator website. They're going to give away copies of the My Digital Studio (MDS) program to teachers who request it for their schools! This easily makes my list of "the best things Stampin' Up! has ever done". If you're a teacher, or if you know a teacher, or if your children have a teacher, or if you've ever had a teacher, or if a teacher passes you on the street tell them to email me and I will send them the form and information they need.

This comes the day after I blew myself away with how much I've learned  on MDS. I've been waiting (and waiting and waiting---just ask the poor people at my pickup depot, and the people who work across the street from my pickup depot who I've also had stalking the joint) for my latest order of MDS print products to arrive.

As you may recall, I said my new years resolution this year was to get better at MDS.  I haven't become the expert that I'd like to be, but I've definately learned alot and am WAY more comfortable using it. In this box, I got several individual printed pages in different sizes, two albums (COMPLETE don't you know) and a cute little journal I made as well.


One of the albums is 8 1/2 x 11 photos only, no decorations, no journalling, no junk, because the pictures are fantastic. Last fall, my parents, grandparents, sisters and their families all gathered for some family photos. The pictures are gorgeous. They really are. I've been dragging my feet getting some printed, or doing anything with them really, until the lightbult went off in my brain. I took them all and put them in this book, and it really does look amazing. I wish I could show you. I've never wanted to show off pictures of myself more than I do right now!
 
The other album is a 12 x 12 recap of 2011. I'm so behind on scrapbooking its getting ridiculous. So when Stampin' Up! released the Year in Review digital download (#125743), I was all over it. It has 28 pre designed pages, already decorated, ready to add photos and journalling to. You can change it and edit it as much as you want, but honestly, I didn't do very much. I added a new journalling box here and there, and an extra flower or cloud to cover up a part of a photo I didn't like (such as the date or some other blaring ugliness). I also created my own cover (which you don't have to do if you don't want to).
A Year in Review Photobook Template - Digital Download
Words on a blog can't tell you how easy it was! My photos were already on a memory card. I stuck it in my computer, and dragged and dropped them onto the pages in the months that they go in. The program resized them, matted them and made it all look good. The program. Not me. The program. And now I've got an entire year of pictures scrapbooked! I've still got the photos if I decide I have extra time and want to go and make some more detailed pages of some of the events that happened (I doubt that we really need to discuss the extra time comment, do we?).
 
Do you want to know how much mess I made scrapbooking an entire album? If you've scrapbooked before, you can imagine quite easily how much mess a 28 page album would make, and how many supplies I'd need. I used two things. My computer, and my memory card. That's it. I'm dead serious.
 
It's been years since I've actually had a completed ALBUM to show my family. Partly because of the mess. Partly because of the cost. Partly because of the time. I've got a whole slough (how do you spell that word? slough? slew?) of  excuses.
 
I could hardly wait for them to come home yesterday so I could show them. The kids poured over it. The Hub, well, he never surprises me. He didn't like it, and didn't think it was worth commenting on. But I was so proud that I made him. You know what he said? Do you? He said "I like seeing your handwriting on the pages better". Awww. I guess I can take that. And next time, I will add some handwritten journal entries.
 
If you see me around in the next few days, I will likely have at least one of these albums with me. Ask me, I would LOVE to show you! 
 
And if you're just reading this and you want to see more, call me up, come over for a cup of coffee and I'll show you what MDS can do!
 

- Posted using BlogPress from my iPad

Wednesday, September 5, 2012

A study in Island Indigo

I've found a new love ladies.

Ya, i called you ladies. No need to get your panties in a knot...we all know there's no men reading this cutesie lil Stampin' blog.


My new love is Island Indigo. It's not a band, or a brand of trendy athletic wear. Heck, it's not even a drink (and it's not much of a secret that I've been known to tip back a bevvy once in awhile!). It's a Stampin' Up! Colour, and it's lovely. I've always had a bit of a crush on it, we made eyes at each other a few times even. But once I saw it dressed up in that ruffled ribbon dress...I was a goner. I can't stop thinking about it!

So, I took it out on a date. We played with some stamps, made some shapes with paper, and she even put on that ruffled ribbon dress again!


This one fits a A10 envelope. I used:
Whisper White card stock
Island Indigo card stock
Island Indigo Classic ink
Sassy Salutations stamp set
Button Button stamp set
Dots Textured Impressions Embossing Folder
Big Shot
Corner rounder
Stampin' Dimensionals
1" circle punch
1 3/4" square punch
Island Indigo ruffled ribbon
Basic Pearls

The only thing that could have made our date better was if I had one of the new style Island Indigo ink pads and the colour and images would have been even brighter and sharper!

- Posted using BlogPress from my iPad

Monday, September 3, 2012

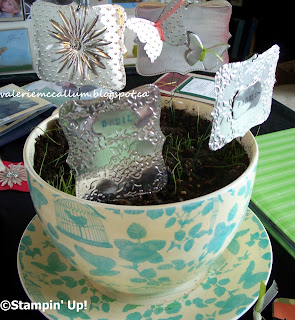
Garden Stakes

Have you seen these before? I think I posted a picture of them with my open house/anniversary photos. They make me smile every time I see them in my garden, so I thought I'd chat a bit more about them.

 
The Hub calls this material 'flashing'. I put that in quotes because I refer to it as 'that roll of shiny metal stuff in the shop that is always in the road that I think you used when you were shingling the roof'. He knew what I meant. Nuff said.


I found a pair of tin snips and cut off a long strip of it just wide enough that it would still pass through my Big Shot. Then, I just kept feeding it through the Big Shot with different dies. I wouldn't use Sizzlets or other thin dies, but the Originals and Bigz work great! So do the Textured Impressions Embossing Folders. Be careful, the edges are sharp, and you'll want to pick out the little slivers of metal that are left in your die--carefully. If you want to stamp them, you'll want to use Staz On ink. I used my Crop-a-dilemma (ha ha ha ha ha ha ha ha ha, my iPad autocorrected Crop-a-Dile to Crop-a-dilemma...too funny!) to punch any holes that needed to be punched and stuck things that needed to be stuck together with brads.

You should make some too, I'd love to see them!!

Saturday, September 1, 2012

Free Ribbon and a hilarious video, what more do you need really?

I know you're waiting for pics from the baby shower, so am I. My camera crapped out on me. It threw a really big hissy fit just as we were putting the finishing touches on our decorations. I hate it. I've hated it for the last couple years, but just haven't had a chance to replace it yet. So now, I'm at the mercy of my sister and must wait for her to share photos with me. :-(. We went to The Hubs adorable nephews first birthday party this week too and guess what? No darn pictures. Sometimes I just want to sit down and cry, or throw my own hissy fit. Either one really.

My post is not all whining and complaining....I've got free ribbon for you!!! If you've been paying attention to my blog you'll know how much I love ribbon! You might too, if its free!

You’ve bought all the back-to-school clothes and supplies and are about to send those adorable kids on their way; now it’s time to do something for YOU! First on your list? Taking advantage of Stampin’ Up!’s back to ‘spool’ promotion during September! Get a FREE spool of 3/8" Stitched Satin Ribbon with every $50 purchase—choose your favourite new In Color or earn all five! Click on the shop now link and it will take you directly to my online store. No limit! Stock up!
Ok. Do me a favour. Watch this video. If you've never clicked on a video link in a blog before, click on this one. This video made me LOL and I don't use that term lightly. I really did, especially during the clean up part. This gal is totally completely my style of funny. Love it! Leave a comment, tell me if you did too. Or tell me if you thought it was just plain dumb. I can handle it. I'm a big girl (who throws hissy fits now and then..,.aren't we all?)!


- Posted using BlogPress from my iPad